Curing Silicone in SLA Photopolymer Molds
SLA (stereolithography) printers are excellent for creating finely detailed parts with beautiful finishes. Their detail and ability to create complex shapes without the extensive support required on FDM printers make them theoretically ideal for creating masters for silicone molds, which in turn would allow them to create extremely high quality parts. SLA printers were once out of reach of the average consumer, but may now be purchased for as little as a few hundred dollars.
There is a caveat, though: The materials needed to create a finished mold can be complicated and may have unexpected reactions with each other. Many stages of the process can cause curing failure in the silicone, resulting in a goopy mess instead of a professional mold. Even something as simple as wearing latex gloves instead of vinyl can cause your mold to fail.
Processing Mold Masters
I recently purchased a SparkMaker SLA printer and some Smooth-On Mold Star 30 to make molds for a new project, but immediately ran into curing issues when the silicone was added. Even days of curing time wouldn’t produce a finished mold.
Something was wrong with the resin, the silicone, or the finishing procedure. Since the finish was something I could easily control, I decided to print identical objects, perform a wide range of finishes, and cure the same batch of silicone in all of them.

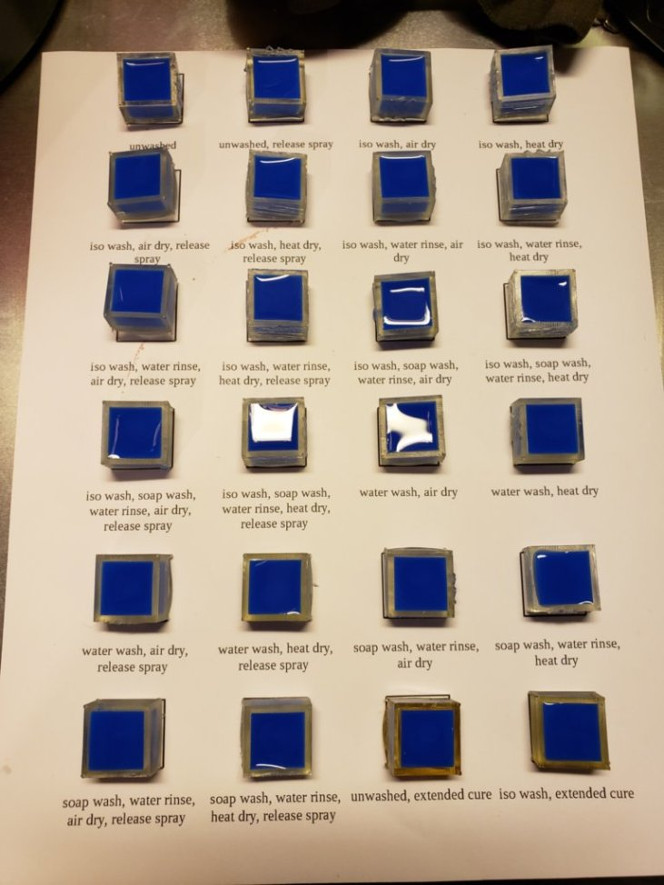
To this end I outlined 24 different finishing procedures of varying practicality in order to collect data on exactly how an SLA print should be processed when it will be used with molding silicone. Not all of them seemed sensible, but taken together would demonstrate why silicone can fail to cure in SLA prints, assuming the problem was with the finishing procedure.
Materials
For this test, the following materials came into direct contact:
- partially-cured translucent ELEGOO photopolymer resin (MSDS)
- fully-cured translucent ELEGOO photopolymer resin
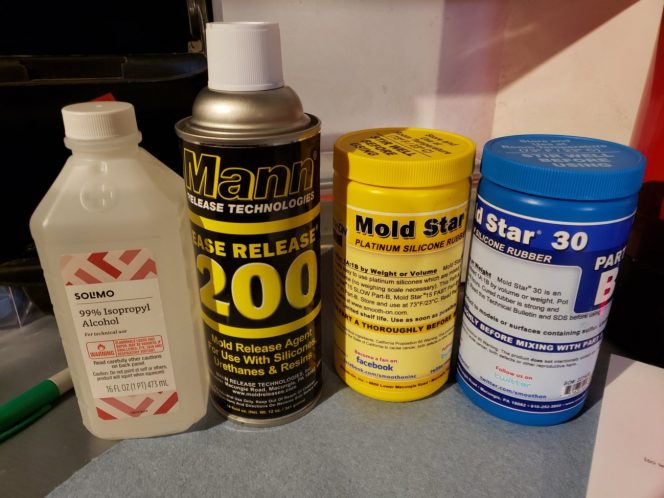
- Smooth-On Mold Star 30 casting silicone (MSDS)
- Mann Ease Release 200 mold release agent (MSDS)
- polypropylene syringes
- polypropylene mixing cups
- birch mixing sticks (standard popsicle sticks)
- 99% isopropyl alcohol (MSDS)
- Dawn dish detergent
- water
In addition, I used the following equipment as part of the printing and finishing process:
- respirator
- nitrile gloves (whoops, turns out this is a bad idea)
- UV safety glasses
- ultrasonic parts bath
- UV curing chamber (nail dryer)
- vacuum degassing chamber
- heat gun
- steel razor blades
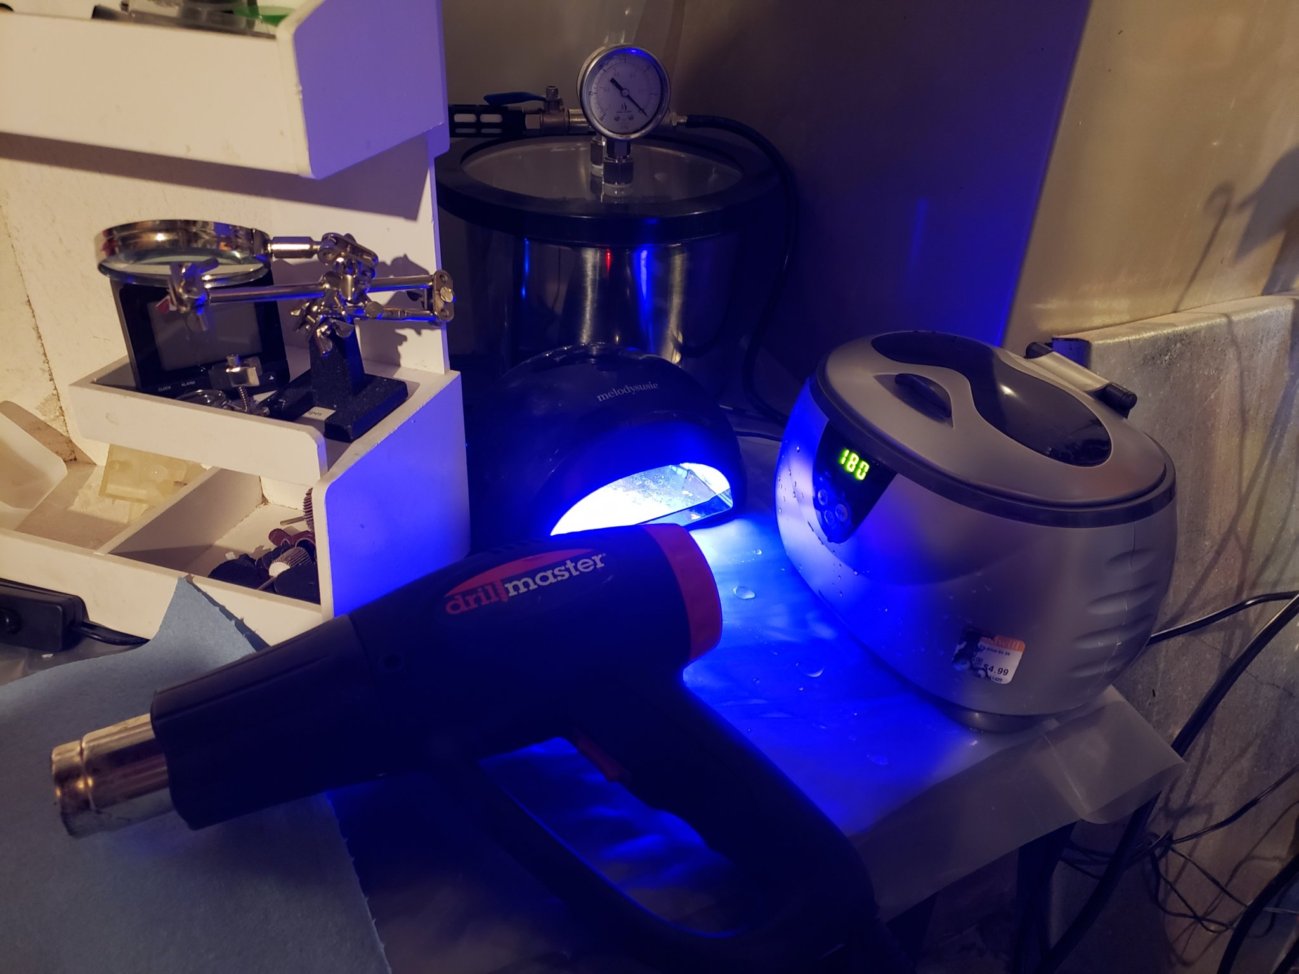
These tools and materials can be nasty. Always wear your PPE.
Finishing Processes
Parts made on many SLA printers are in what’s called a “green state” when they leave the printer bed, and are routinely washed, dried, and given a second UV cure before use. Traditionally this wash is done with isopropyl alcohol, as it works very well to break down any uncured resin on the green part. My theory at this stage was that small amounts of isopropyl alcohol were inhibiting the cure.
In order to get a good look at which finishing procedures would lead to good curing versus failed cures, I designed a battery of 24 processes for identical printed cups that would each hold a small amount of mixed silicone. The following finishing processes were tested (cures for 30 seconds unless otherwise noted):
- raw (green) part > cure
- raw (green) part > cure > release spray
- isopropyl wash > air dry > cure
- isopropyl wash > heat dry > cure
- isopropyl wash > air dry > cure > release spray
- isopropyl wash > heat dry > cure > release spray
- isopropyl wash > water rinse > air dry > cure
- isopropyl wash > water rinse > heat dry > cure
- isopropyl wash > water rinse > air dry > cure > release spray
- isopropyl wash > water rinse > heat dry > cure > release spray
- isopropyl wash > soap wash > water rinse > air dry > cure
- isopropyl wash > soap wash > water rinse > heat dry > cure
- isopropyl wash > soap wash > water rinse > air dry > cure > release spray
- isopropyl wash > soap wash > water rinse > heat dry > cure > release spray
- water wash > air dry > cure
- water wash > heat dry > cure
- water wash > air dry > cure > release spray
- water wash > heat dry > cure > release spray
- soap wash > water rinse > air dry > cure
- soap wash > water rinse > heat dry > cure
- soap wash > water rinse > air dry > cure > release spray
- soap wash > water rinse > heat dry > cure > release spray
- raw (green) part > extended cure (300 seconds)
- isopropyl wash > extended cure (300 seconds)
The anti-contamination procedures you would expect were used: One soap bath, for example, only contained pieces previously washed in isopropyl alcohol, and a fresh soap bath was made for pieces that had not contacted alcohol, etc. Each bath occurred in the ultrasonic cleaner for exactly three minutes. Each piece was patted dry with a fresh paper towel after all its baths were complete and before having heat applied or being left to air dry. Heat treated parts were placed in a box and warmed for approximately five minutes with a heat gun, at which time they appeared completely dry and slightly yellowed (most developed cosmetic fractures). All pieces, even those that were heat dried, were allowed to sit for three hours before any release agent was applied, at which point all pieces sat for an additional thirty minutes.
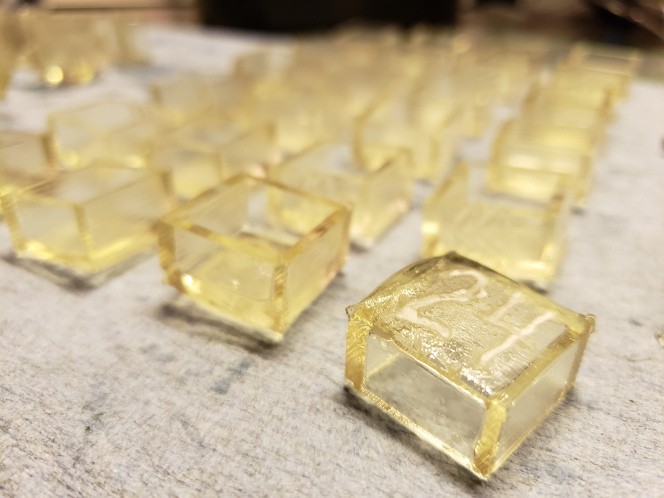
Some of the finishes vary only slightly, so significantly different results were not expected for each. Each finish step was chosen to test a particular idea; however, all combinations of steps were used regardless of whether they made sense for extra data points and sanity checks. Isopropyl alcohol was used because it breaks down uncured photopolymer resin, which might inhibit the silicone cure. Soap was used as a general cleaning agent and potential alternative to isopropyl alcohol. Water was used to clean off the residual soap and/or dilute any isopropyl alcohol or uncured resin. Heat was used to see if there was any difference in the evaporation of alcohol and moisture off the part (more on that to come). Release agent was used to see if it would insulate the part from the mold regardless of the finish’s residuals.
Testing the Cures
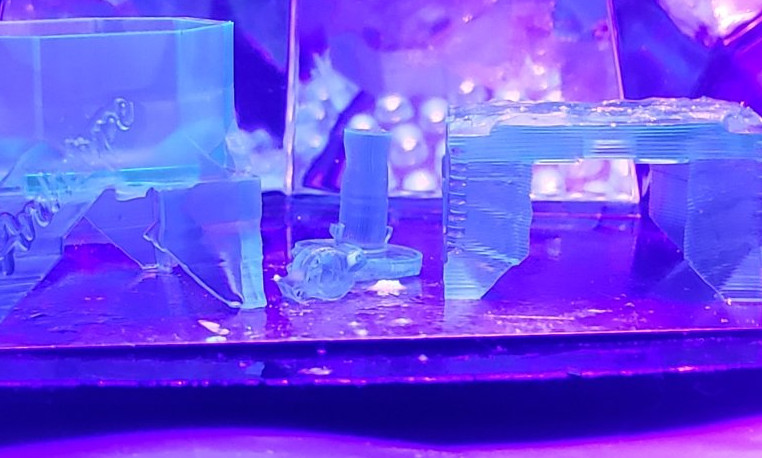
After mixing the silicone parts in the recommended 1:1 ratio, I added 2ml of silicone to each cup and waited for the recommended cure time of six hours. Unfortunately my workbench area dropped about ten degrees Fahrenheit colder than the recommended curing temperature of 73 during this time, so that could have inhibited some of the curing process. Upon checking the parts clear differences were evident, but none had fully cured including the control in the mixing cup. I waited three more hours, at which point curing was still not complete (some would never complete–tested anyway), but many were ready for a hardness test.
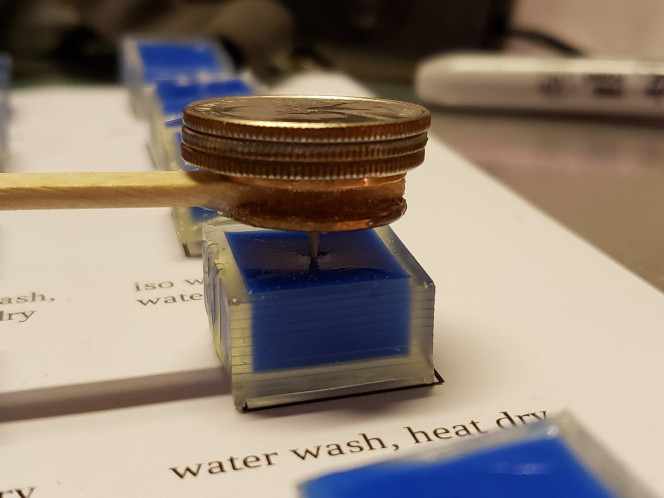
To test the cures, I sandwiched a popsicle stick between two pennies and glued the point of a toothpick to the bottom. This allowed me to hold the instrument in position while applying minimal force to the surface of the silicone. I then stacked quarters on top of the pennies until the toothpick was fully depressed into the silicone, since quarters have a known weight. The number of quarters needed to fully depress the point provides some evidence of how thoroughly the silicone had cured, more quarters indicating a better cure.
Conclusions
The best cure has the maximum hardness and does not deform from the mold. I am defining deforming as silicone being pushed over the lip of the mold, or up to touch the penny before the toothpick was fully depressed.
Wash Results
To see which wash is best, I took the average of the parts given each of the following wash processes:
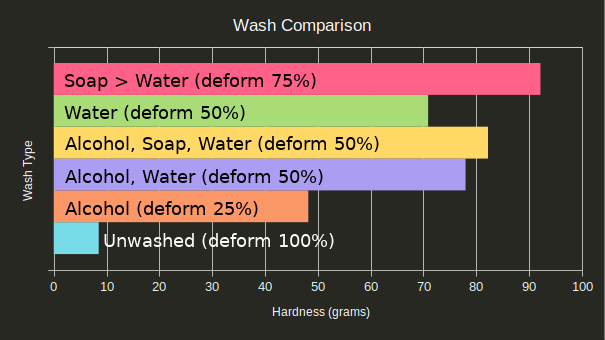
Since release agent appeared responsible for a number of the deformations, as will be covered later, here is the same chart with any tests involving release agent omitted:
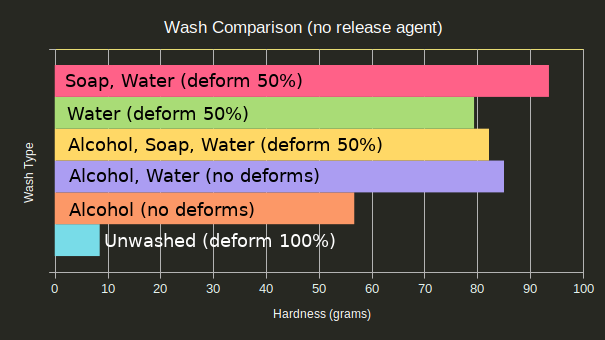
Unwashed parts are clearly the worst and resulted in goopy molds that never cured, even a day later. Washing only in isopropyl alcohol also didn’t result in as good of hardness as expected, though it did have a lower chance to deform under pressure. Soap and water resulted in the best hardness, but also had a high rate of deformation.
The ideal wash procedure seems to be an isopropyl alcohol bath followed by a water bath to dilute any residual isopropyl alcohol.
Dry Results
Air drying vs. heat drying was the unexpected star of the show.
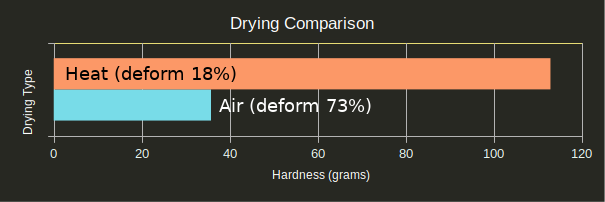
Regardless of finish process, heat treating the part always resulted in a significantly better cure and lower chance of deformation. The heat seems to be curing the parts in some way the UV is not, and this cure in turn allows the silicone to cure. This was supported by tests #23 and #24 in which the parts were UV cured 10x as long as tests #1 and #2: The over-cured parts performed only marginally better than normally-cured parts (withstanding one quarter instead of none, and four quarters instead of two respectively), and both were still goopy after 24 hours.
Perhaps the biggest takeaway from this post is that you should get in your car, go to a thrift store, and buy a toaster oven to go with your SLA printer if you intend to mold anything.
Release Agent?
Release agent should be used when molding silicone against silicone; however, would it improve the quality of the mold if sprayed onto the SLA parts?
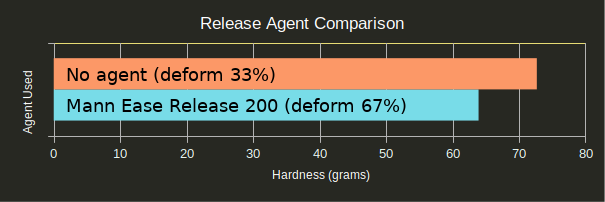
Spraying release agent directly onto your SLA masters doubles the chances of deformation, though it does not significantly reduce the hardness of the material. This was likely due to the mold being able to lift off of the master during testing and reach up to touch the penny. As force was added to the center of the mold, the sides were free to move and assume a new shape. The actual hardness of the material is likely identical, though masters without release agent achieved higher measured hardness since the master was able to act as a scaffold for the silicone and resist some force.
In other words, Mann 200 works as intended: If you want your silicone to come out of your printed part, use it; if not, don’t. It has no clear effect on the curing process.
Still Not a Good Idea
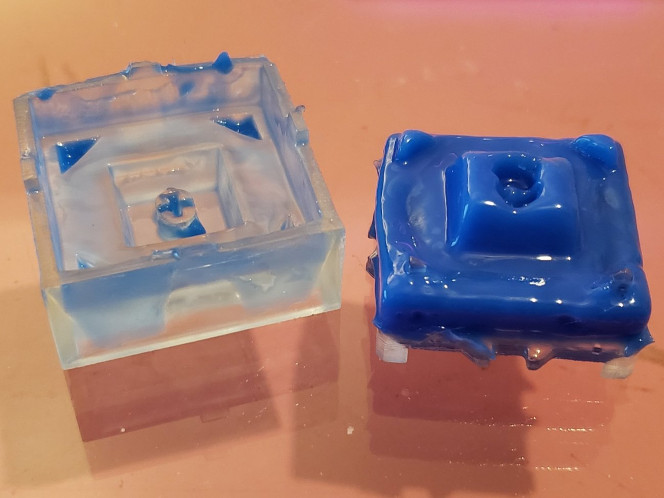
Unfortunately, even with the better curing achieved with these processes, the silicone still fails to cure at the boundary between it and the part. Using the recommendations here do reduce the size of that boundary considerably, but will not result in the kind of mold you’re looking for. Any fine details will be lost, and there will be a goopy layer. Even such a layer only a few microns deep will result in an unusable mold, so something else will need to be done.
Further Testing
All in all, this was a fun foray into workbench science and has given me a new area to investigate: What can you coat the master in to properly insulate the curing silicone from it while retaining very fine details, and how long should you heat treat a part and at what temperature for the best possible compatibility? More on that to come, as I did buy a toaster oven.