Wacom Intuos and xsetwacom on Ubuntu 18.04
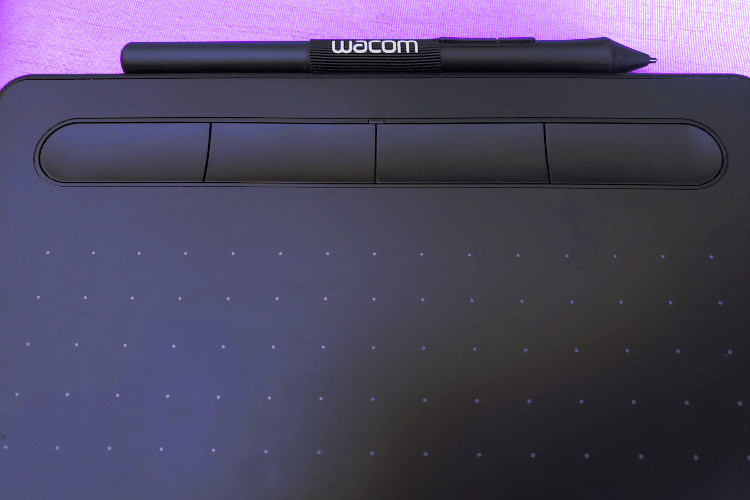
The Wacom Intuos is a common tablet used for creating digital artwork and vector drawings. It works surprisingly well on newer Ubuntu machines using built-in drivers and xsetwacom–perhaps even easier than on Windows, where support for the factory software can be lacking (Windows 7) or somewhat difficult to install (Windows 10).
xsetwacom scaling and multiple monitors
The Intuos will immediately begin working when plugged in; however, if the tablet input isn’t proportional to your screen or you’re using multiple monitors, you may need to tweak its resolution so the pen only maps to the right area. You can easily do this with xsetwacom, which should already be installed by default.
First, open your terminal and determine which devices you have connected. Note the ID of “Wacom Intuos S Pen stylus.”
xsetwacom --list devices
On my machine, this command outputs the following:
Wacom Intuos S Pen stylus       	id: 15	type: STYLUS
Wacom Intuos S Pen eraser       	id: 16	type: ERASER
Wacom Intuos S Pen cursor       	id: 17	type: CURSOR
Wacom Intuos S Pad pad          	id: 18	type: PAD
Next, get the resolution of your stylus. This will output the vertices that currently map to the top left and bottom right of your screen(s).
xsetwacom --get 15 area
On my machine, this tells me 0 0 15200 9500. Think of this like two points: The upper left is at 0,0, and the bottom right is at 15200,9500, or the width is 15200 and the height is 9500.
Since I have three monitors of the same size, we can ignore the Y axis–it’s already working properly. Touching the pen to the top of the pad goes to the top of the screen, and same with the bottom. The X axis isn’t how I’d like, though. With an X of 15200, currently the pointer goes all the way to the right side of the third monitor. I need to make the X of 15200 only at the far right of my first monitor. Since my monitors are the same size, this is rather simple: I just incorrectly report that the area is 3x as wide as it is, then X of 15200 becomes the far right-hand side of my first monitor.
xsetwacom --set 15 area 0 0 45600 9500
Another way to think of this is you’re telling the tablet it’s 3x as wide as it really is. The empty spot where you’re saying there’s more tablet is mapping to the other screens. If you need help visualizing this, check out this helpful post by james00000001 on the Ubuntu MATE community. If I wanted to use the tablet on my middle monitor, I’d still make it 3x as wide, but I’d offset it by its width:
xsetwacom --set 15 area -15200 0 30400 9500
If I wanted it to map to my third monitor, the same concept applies:
xsetwacom --set 15 area -30400 0 15200 9500
If your monitors aren’t the same resolution or your input area isn’t matching up to your monitor size, you’ll have to do a little math. Hopefully you’ve brushed up on your fractions! Just remember on each axis if your cursor is going farther than you want then you need a bigger number, and vice versa.
Inkscape input method
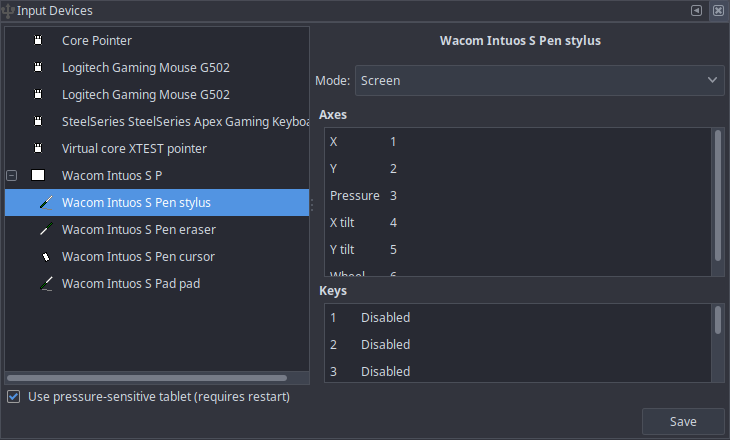
Even though your cursor is now showing up in the correct location, your lines in Inkscape may not. To fix this, go to Edit > Input Devices. A pane will pop out on the right with your current devices. You should see your tablet with an expander to its left. If not, make sure “Use pressure-sensitive tablet (requires restart)” is clicked below the list and restart Inkscape.
Expand your list of Wacom inputs. Click into each one and set its Mode to “Screen,” then click Save.
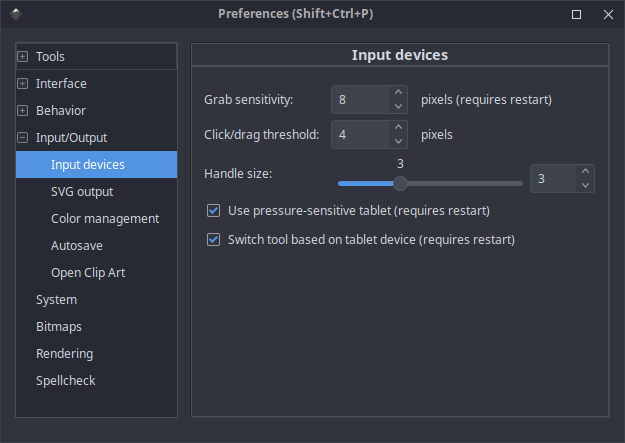
Next, go to Edit > Preferences and find “Input Devices” under “Input/Output.” Ensure “Switch tool based on tablet device (requires restart)” is checked, then restart Inkscape.
Once Inkscape reloads, your lines should match up with your pen location on the screen.
Customizing the pad buttons
The buttons on your Intuos pad can be set to anything you like with a single command each. First, figure out the keystrokes you want each button to do. For my setup, I want the four buttons across the top to be “Draw Bezier curves and straight lines,” “Select and transform objects,” “Raise object,” and “Lower object.” The key combinations for each of these are Shift-F6, F1, Page Down, and Page Up. Using xsetwacom, these can be assigned with one command each.
First, get the ID of your pad from your device list again using xsetwacom --list devices. Mine is 18.
Wacom Intuos S Pen stylus       	id: 15	type: STYLUS
Wacom Intuos S Pen eraser       	id: 16	type: ERASER
Wacom Intuos S Pen cursor       	id: 17	type: CURSOR
Wacom Intuos S Pad pad          	id: 18	type: PAD
Now using one command for each button, assign a key sequence to it beginning with the word “key.” For multiple keys, leave a space between the keys.
xsetwacom --set 18 button 1 "key shift f6"
xsetwacom --set 18 button 2 "key f1"
xsetwacom --set 18 button 3 "key PgDn"
xsetwacom --set 18 button 8 "key PgUp"
This part can be fiddly since the button numbers don’t line up with exactly what you’d expect. The four buttons on my Intuos CTL-4100 are 1, 2, 3, and 8, and buttons 4, 5, 6, and 7 don’t exist. The reason for that is a little deeper than this article needs to go–just know that if you try to set a command on a button that isn’t there, it will tell you “Unsupported offset into ‘Wacom Button Actions’ property” and nothing bad will happen.